







Most missed deadlines start as one buried line in an email. If I want to stop that from happening, I need one simple system that shows who owns the task, when it’s due, and when I’ll review it.
Here’s the short version of the article:
-
I can use NeatMail to spot commitments in sent and received emails and keep them in a follow-up queue.
-
I can mark emails with Gmail labels or Outlook categories so action items stand out.
-
I can use Outlook follow-up flags for due dates and Gmail stars for visual priority.
-
I can turn emails into Google Tasks or Microsoft To Do items when I need a date and next step.
-
I can use Gmail Snooze or Outlook reminders to bring threads back at the right time.
-
I can set filters, rules, and Quick Steps to sort repeat commitment emails with less manual work.
-
I still need a 10-minute daily check and a 20-minute weekly review to catch what slips.
A few points stand out fast. First, inboxes sort by newest message, not by what I owe. Second, splitting work across email, calendar, and task apps makes missed follow-up more likely. Third, a system only works if I use it the same way every time.
The main takeaway: I should pick one primary way to track commitments and use the other tools as backup, not build a messy stack of half-used systems.
Quick Comparison
| Method | Best use | Due date support | Setup |
|---|---|---|---|
| NeatMail | Auto-tracking commitments | Yes | Low |
| Labels / Categories | Mark emails that need action | No | Low |
| Flags / Stars | Show priority or deadlines | Outlook: Yes / Gmail: No | Low |
| Tasks / To Do | Store next steps | Yes | Low |
| Snooze / Reminders | Bring threads back later | Yes | Low |
| Filters and folder rules | Sort repeat patterns | No | Medium |
| Daily / Weekly Review | Catch missed items | No | Low |
If I get lots of email, automation helps. If my inbox is lighter, manual labels, flags, and task lists can still work well. Either way, the goal is the same: keep commitments visible before they drop out of sight.
Why Email Commitments Get Missed
Most email apps sort messages by sender, subject line, or recency. Meanwhile, newsletters, alerts, and messy CC threads push actual obligations out of sight [1]. That’s the heart of the issue: your inbox is built around arrival, not obligation.
And that creates a simple but costly problem. A promise buried inside a long thread is easy to miss because it doesn’t have a clear owner, due date, or review step [1].
Using separate tools makes this worse [2]. If commitments live across email, calendar, and task apps, the context gets chopped up. One part is in the message. Another is on the calendar. Something else sits in a task list. That’s when things slip through the cracks.
Every promise needs three things: a visible owner, a due date, and a review step. The seven methods below show how to make commitments visible, dated, and reviewed inside Gmail and Outlook.
1. Use NeatMail to Detect and Track Commitments Automatically
NeatMail, one of the best AI tools for email follow-ups, scans sent and received email for commitments [1]. It turns promises made in email into a follow-up system you can actually see before those threads disappear into the pile. Each commitment stays tied to an owner, a due date, and a next step.
It tracks both outgoing promises and incoming requests [1]. When NeatMail spots a commitment, it moves that thread into a Follow Up label so it stays in view [1]. It also pulls out due dates and drafts a reply when the deadline arrives [1]. If you promised files, it can attach them to the reply too [1].
On the security side, NeatMail connects through read-only OAuth access, stores no email content permanently, and is CASA Tier-2 and ESOF verified [1]. If you want a manual backup, you can mirror the same queue with labels or categories.
2. Mark Commitment Emails with Gmail Labels and Outlook Categories
If you don't have automation set up, tagging commitment emails is the fastest way to keep them in plain sight. The idea is simple: make every obligation easy to spot before it slips away. Use these tags ONLY for messages that need a reply, a decision, or a deadline.
In Gmail, labels let you mark commitment threads without moving them. Stick with one label set, like Commitments or Waiting On, and use it for every promise you need to track. You can also use nested labels, such as Commitments/Client or Commitments/Internal, to split those promises by context without building a separate inbox.
In Outlook, categories give you color-coded visibility. Use folders only if you want to move commitment emails out of the inbox view. That's the key difference: a folder keeps each email in one place, while categories can sit on any message no matter where it lives.
| Feature | Gmail Labels | Outlook Categories / Folders |
|---|---|---|
| Storage logic | Non-exclusive; one email can have many labels | A folder holds each email in one place |
| Hierarchy | Nested labels via / | Subfolders |
| Inbox visibility | Labels appear next to the subject line | Categories add color coding; folders separate mail |
Use one label or category name for every commitment, and apply it before you archive the message. Once it's tagged, the next move is to attach a due date.
3. Assign Due Dates with Outlook Follow Up Flags and Gmail Stars
Once you've tagged a commitment, add either a deadline marker or a visual marker. The choice is pretty simple: does this item have a real due date, or do you just want to keep it in view?
Outlook Follow Up flags are the better fit when a commitment has an actual deadline. Use them to track due dates, and add a reminder or task when you need a prompt. A flag creates a review point right inside your inbox, so the commitment doesn't quietly slip away.
Gmail stars work in a different way. Use them only as a visual priority marker, not as a due-date system. A star helps keep a thread visible while you figure out the next step, but it won't remind you to review it on its own.
So the rule of thumb is straightforward: use stars for priority sorting and flags for real deadlines. If a commitment needs more than a simple marker, turn it into a task.
4. Convert Emails into Tasks with Google Tasks and Microsoft To Do
Sometimes a flag or star just doesn’t cut it. If an email needs follow-through, turn it into a task right away.
That matters because a task gives the item a due date and a clear place to store the next step. Instead of leaving the work buried in your inbox, you move it into one spot built for action.
If you use Gmail, go with Google Tasks. If you use Outlook, use Microsoft To Do. Create the task from the email, keep the main details in the task notes, and add a link back to the thread.
That setup makes commitments easier to track. The due date, notes, and next action all stay together in one place, which means there’s less chance the item slips through the cracks.
Use email-to-task conversion when a message needs a due date, clear next steps, or more context than an email thread can comfortably hold.
5. Resurface Open Threads with Gmail Snooze and Outlook Reminders
Not every promise or follow-up belongs on a task list. Some emails are better handled right where they live. That’s where snooze and reminders come in, especially when you’re waiting on someone else to do their part.
Gmail Snooze hides a message until the time you choose. Outlook Reminders do something different: they keep the thread in view and send you an alert at the time you set.
The big mistake? Using vague timing. Don’t just click "Tomorrow" and move on. Pick the exact day and time you’ll need to act. If a vendor says they’ll send a contract by Friday at noon, set your snooze or reminder for Friday at 12:30 PM. Simple, clear, and hard to miss.
Use this quick comparison to decide which one fits the thread:
| Feature | Gmail Snooze | Outlook Reminders |
|---|---|---|
| What it does | Moves email out of the inbox until the set time | Keeps email visible and triggers a desktop or mobile notification at the scheduled time |
| Best for | Future tasks you plan to handle yourself | Threads you're waiting on or need to follow up |
| Visibility | Hidden from the main inbox view until the timer hits | Usually stays visible in the Flagged Email folder or Tasks pane |
| Platforms | Web, iOS, Android | Desktop app, Outlook Web, Mobile |
Use Gmail Snooze when you plan to handle the message later yourself. Use Outlook Reminders for waiting-on threads that should stay in sight.
6. Automate Commitment Sorting with Gmail Filters, Outlook Rules, and Quick Steps
When the same kind of commitment keeps showing up, automate the sorting. Manual tagging works for a while, then falls apart once inbox volume starts piling up.
Set up rules around repeat phrases like "I'll send", "follow up", "due," or a date. When an email matches, have it auto-labeled, flagged, or moved to an Action Required folder, then archived. That way, the message lands where it belongs without you touching it.
There’s one detail worth knowing in Outlook. Rules made in Outlook on the web run server-side, so they keep working even when the app is closed. Rules made in the desktop app are client-side, which means they run only while the app is open.
Outlook Quick Steps work differently. They don’t run on their own. Instead, they give you a one-click shortcut for a few actions at once, like moving an email to a folder, flagging it for follow-up, and marking it as unread. They’re a good fit for one-off commitments that don’t show a clear pattern.
A simple setup that works well in both Gmail and Outlook is this: send emails where you’re CC’d, but not listed in the To field, out of the main inbox and into a CC - FYI folder. It’s a small change, but it helps keep direct commitments in plain sight.
Use rules for repeat patterns. Use Quick Steps for the oddball cases.
Here’s a quick-reference table for useful commitment-sorting rules:
| Rule Category | Criteria / Keywords | Action |
|---|---|---|
| Urgent Signals | Subject: "urgent", "deadline", "ASAP" | Mark as Important, Keep in Inbox |
| Finance/Billing | Subject: "invoice", "receipt", "billing" | Skip Inbox, Label "Finance" |
| Low-Priority CC | To does not contain your email | Skip Inbox, Label "CC - FYI" |
No filter stays accurate forever. Spend 10 minutes every Friday checking your filtered folders for false positives, especially commitments that got filed in the wrong place. That Friday audit helps you catch mistakes before they turn into missed commitments.
7. Run a Daily Review and Weekly Audit of Open Commitments
Filters, flags, and labels help a lot. But they don't work on their own. You still need a daily check and a weekly audit to catch the things those tools miss.
The daily review should take about 10 minutes. Each morning, scan all tracked commitments. The point is simple: bring today's deadlines and tomorrow's follow-ups to the surface before they get lost in the shuffle. NeatMail's morning brief shows due items at the start of your day, so they don't get buried under overnight messages.
The weekly review is where you clean up the system. Set aside 20 minutes at the end of the week to audit open items. This is where you catch the loose ends: a snoozed email that never got handled, a task that got pushed without a new due date, or a flagged thread that's gone stale.
Go through your Follow Up label or Flagged folder, your task lists, and any snoozed messages still sitting open. Close what's done. Reschedule what's still active. Remove anything that's no longer active.
Here's a simple checklist for the weekly reset:
| Step | Action | Goal |
|---|---|---|
| 1. Review flags and stars | Review all flagged emails and starred messages | Confirm each one still needs action |
| 2. Check task lists | Open Google Tasks or Microsoft To Do | Update due dates, close completed items |
| 3. Review snoozed threads | Look at snoozed messages in Gmail or Outlook | Decide: act now, reschedule, or delete |
| 4. Scan commitment labels | Open your Follow Up or other custom labels | Catch anything that was labeled but not resolved |
| 5. Check filtered folders | Review auto-sorted folders for missed commitments | Spot anything that was moved but still needs action |
The daily check keeps active commitments in view. The weekly audit catches what slipped past that first pass. Next, compare which workflow fits each inbox.
Side-by-Side Workflow Comparison
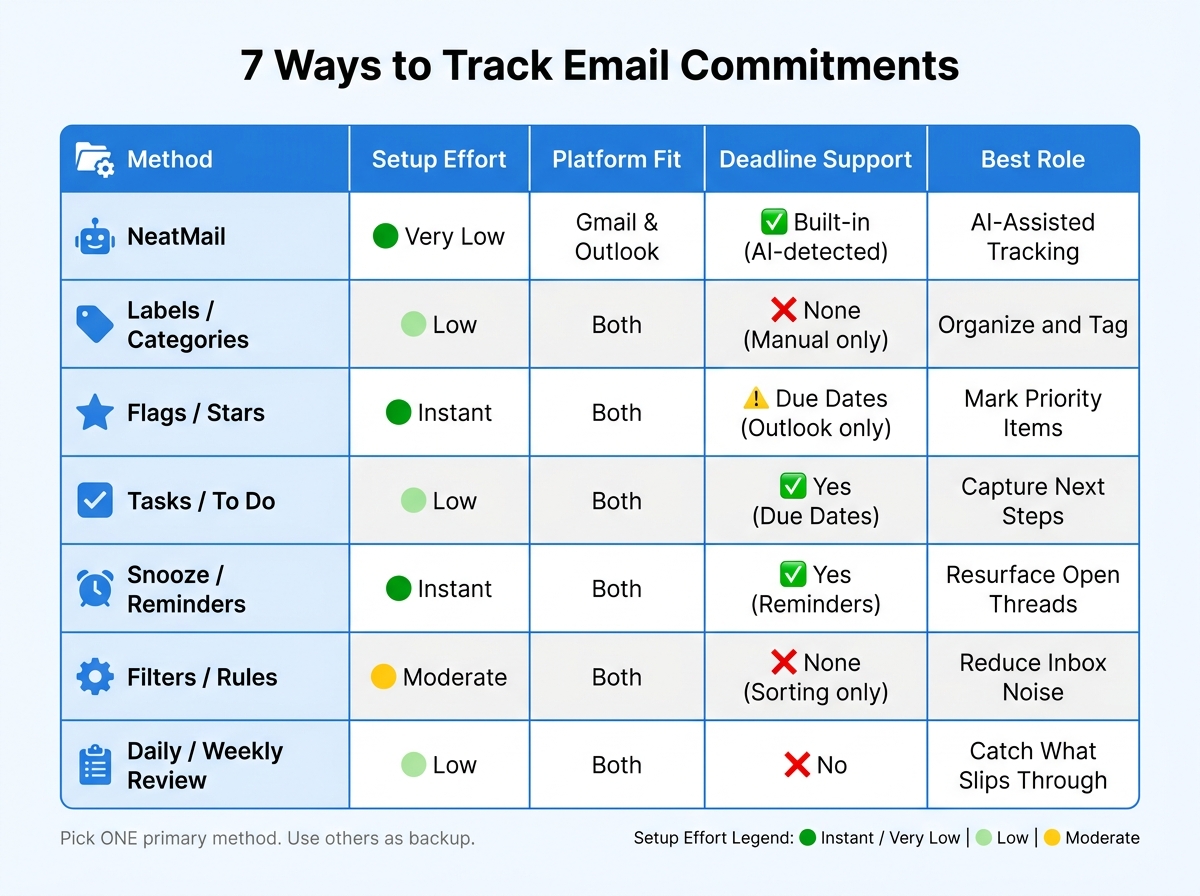
After the seven methods, use this comparison to pick one main workflow.
| Method | Setup Effort | Platform Fit | Deadline Support | Best Role |
|---|---|---|---|---|
| 1. NeatMail | Very Low | Gmail & Outlook | Built-in (AI-detected) | AI-Assisted tracking |
| 2. Labels / Categories | Low | Both | None (Manual only) | Organize and tag |
| 3. Flags / Stars | Instant | Both | Due dates (Outlook only) | Mark priority items |
| 4. Tasks / To Do | Low | Both | Yes (Due Dates) | Capture next steps |
| 5. Snooze / Reminders | Instant | Both | Yes (Reminders) | Resurface open threads |
| 6. Filters / Rules | Moderate | Both | None (Sorting only) | Reduce inbox noise |
| 7. Daily / Weekly Review | Low | Both | No | Catch what slips through |
Use the method that fits your inbox volume and how often you work against deadlines. Then let the other methods play backup.
Manual workflows work best for lower-volume inboxes, where checking things yourself is still realistic. NeatMail, on the other hand, is built for heavier inbox traffic. It scans sent and received threads all the time, spots deadlines on its own, and drafts follow-up replies when those deadlines hit [1].
Once you pick a main method, fold it into one simple system.
How to Build One Reliable System from These Methods
Use the methods above as layers inside one simple system. If the setup gets too complicated, things slip. Pick one primary tracking layer and one support layer. The primary layer holds your commitments. The support layer catches what the first layer misses.
Most inboxes sort by recency. This system sorts by obligation.
Here’s what that looks like:
| Role | Primary Layer | Support Layer |
|---|---|---|
| Solo founder | NeatMail for automatic commitment detection | Newsletter filter |
| Operations lead | Intent labels such as Scope, Approval, and Status | Daily morning briefing |
| Shared/multiple inboxes | Intent-based auto-labeling | Daily morning briefing |
For solo founders, NeatMail makes sense as the primary layer because it scans sent and received emails for promises and commitments automatically.
For operations leads and other high-volume users, intent labels like Scope, Approval, and Status work well. Add a daily morning briefing, and the system stays usable even as volume climbs.
Once your layers are in place, keep the rest simple. Use only four folders: Action Required, Waiting On, Reference, Archive.
Then stick to one review habit: check Waiting On every week, and move anything older than five days into action or archive.
Conclusion
Every commitment starts as a single sentence in an email thread. Without a clear system, that promise can disappear into the inbox fast. The simplest fix is to pick ONE system and stick with it.
Start with the simplest method that fits the way you already work. You don't need all seven. Just focus on four things: capture, organize, review, and follow through. That could mean a label in Gmail, a follow-up flag in Outlook, or turning emails straight into tasks.
The goal isn't just to collect commitments. It's to keep them in view. Tracking only works when your inbox stays clean enough for those commitments to stand out. Once email volume goes up, manual tracking starts to crack. NeatMail keeps commitments visible without extra manual upkeep, acting as the automation layer that cuts review load inside one reliable system. Pick one method now and make it your default.
FAQs
Which tracking method should I choose first?
Start with the method that fits the kind of email work you do.
If you’re managing commitments inside existing conversations, use a promise-tracking tool that reads threads and pulls out obligations on its own. That way, you’re not digging through long back-and-forth chains trying to remember who said what.
If you’re doing cold outreach, go with a sequence automation tool instead. It’s built for follow-ups at scale and keeps those campaigns moving without manual chasing.
Either way, pick a tool that works inside your current inbox. That one choice can save a lot of friction. No extra dashboard, no separate system, and no need to bounce between tabs just to stay on top of email.
When should I turn an email into a task?
Turn an email into a task when you can’t do the work right away. If it’ll take less than two minutes, do it on the spot. That keeps your inbox from turning into a pile of half-made decisions.
If the work needs more time or focus, move the email to an Action folder and deal with it later. The email itself isn’t the task. It’s just the trigger.
If you use a separate task manager, add the next action there and archive the email.
How often should I review open commitments?
Review open commitments every week. Check your Waiting On folder and follow up on anything that’s been sitting there for more than five business days.
A steady routine helps a lot. Even a quick 10-minute review every Friday can stop things from slipping through the cracks and keep your tracking system dependable.